
2' Enterprise D
Commission Project -
Terry Matalas, Exec Producer & Showrunner
I was contacted by Star Trek: Picard Season 3 Executive Producer & Showrunner Terry Matalas, as he was looking for someone to build an Enterprise D for him, following the conclusion of the final season of the series. Evidently, I was recommended to him by several sources, so he reached out to me....I thought it was a phishing attempt by a fake account when I first saw his messages, I've never told him that! Lol! The first two seasons of the show weren't really my cup of tea but I absolutely LOVED the third and final season, so I was more than happy to take on the project for him.
The brief was simple, as most are - build a physical model that accurately recreates the CG version seen on-screen in the final episodes of the show's finale. However, achieving that brief would take a LOT of work. And, as it turns out, a LOT of time too....!
I've been documenting this project on my Youtube Channel, which goes into a bit more depth with all the modifications, moulding & casting etc.
Click the thumbnail below to be taken to the playlist

Youtube Project Video Playlist


The Enterprise D returns in Star Trek: Picard Season 3!
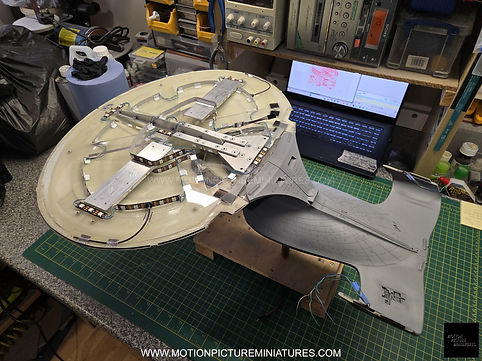
After a little discussion it was decided that a 2' model would be the ideal size - not too small, and not overly large, but a nice size for an office display. It's technically studio scale too, as ILM built a 2' model waaaay back in 1986 for the pilot of TNG! Converting the production-used CG mesh of the ship for 3D printing was far too complicated as it just wasn't designed and modelled that way, it would've been easier to start from scratch! But, I knew of a long out-of-production "garage" model kit that was around 2' in length, so I did some digging and got my hands on one. It wasn't 100% accurate and would need a lot of modifications, but it was a good starting point. As usual, the first thing to tackle would be the internal armature, which would make sure the model stays in one piece for many years to come...


Some parts supplied with the kit were in need of replacement, for a few reasons. The supplied nacelles were quite heavy and not quite as clean and accurate as was needed, so new pattern masters were 3D printed and moulded. The new parts were then cast in fibreglass, making them much more accurate and far lighter. The deflector dish and housing are also quite different on the CG model, as in the story the secondary hull is actually from a different ship, not the Enterprise....watch Star Trek: Generations if you don't know why that'd be the case! So, new parts for those were extracted from the production-used CG model, 3D printed, moulded, and cast in clear urethane resin.


Accurate nacelle parts, cast in fibreglass. FAR lighter!


Comparison between the kit supplied bussard collectors (left) and the more accurate replacements (right)

Accurate deflector dish and housing, extracted from the production-used CG model and modified slightly for correct fitting to the rest of the surrounding hull


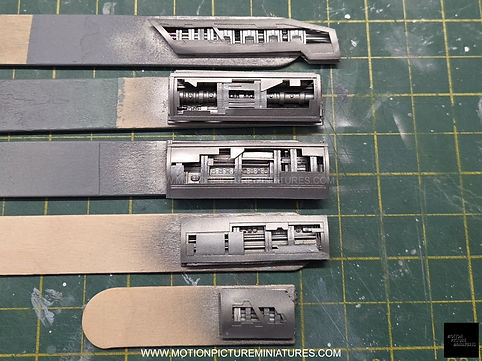
If you've seen the finale of the show you'll know that the Enterprise D was being slowly restored by Geordie LaForge at Starfleet's Fleet Museum at Athan Prime. During the slow and dramatic reveal of the ship inside Hanger Bay 12, Geordie makes a casual throw-away comment about there being a lot more work left to do, and that "the port nacelle covers are a mess", or something like that. Those few words written in the script resulted in a HUGE amount of work for me! Turns out it wasn't just the port nacelle covers that were a mess, he'd also left a load of other panels open on the outside of the ship too, exposing a TON of details underneath them.....and I had to try to replicate all those details!! Luckily, I had the production-used CG model and was able to extract some of the key details to convert for 3D printing. Even with a 2' model, most of those tiny exposed details were just too fine and complex to 3D print whole-cloth at this scale, so most of the general pipework, cables, and overlapping plating were made the "old school" way, with a sharp knife, various pieces of styrene and photo-etched brass details salvaged from other model kits.
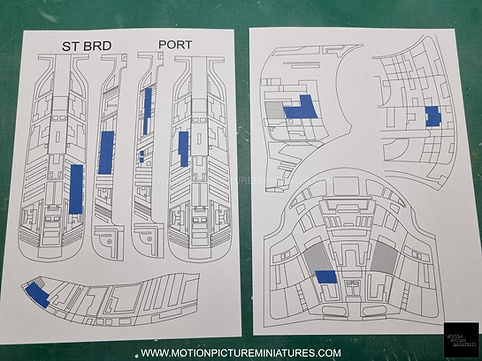
Mapping out the open panel positions. Most are never seen on-screen, and even the one's that are can't be seen in any real detail.....but, y'know.....it's for Terry, so I wasn't going to do any hand-waving with these!

Roughing-out the details for one of the open panels. All cut and assembled by hand

The exposed details seen in the nacelles were particularly complex. These aren't exact, but they capture the general idea. All the grey parts are 3D printed from the CG model itself.

With the overlapping outer cover layers in place, all cut and assembled by hand. This assembly would eventually be fitted to one of the nacelles

All the exposed panel sub-assemblies completed and primed, ready to be fitted to their various locations on the model.


The forward photon torpedo launcher needed some help too, so a more accurate piece was grafted into position.


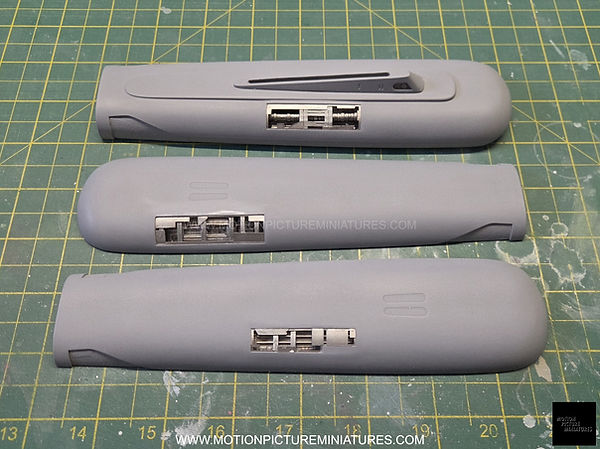
The open panels fitted to their nacelles. Not sure why I didn't include the lower port nacelle in the photo....it definitely has some open panels too?!?!
And that pretty much brings us up to date with where the project is right now, at time of writing this anyway. I'll post more progress soon though, things are still moving forward....see you back here soon!